반응형

1. JSON.stringify()

2. IONIC template rendering


import { Recoder } from "./recoder.model";

export class Recoders extends Array<Recoder> {
  recoders: Recoder[];
  isEmpty: boolean;

  constructor(recoders?: Array<Recoder>) { 
    super(...recoders);
  }
}

Array<T>를 extends 할 경우 모든 배열의 기능을 사용할 수 있다.


하지만 JSON.stringify()를 사용할 경우, isEmpty와 같은 변수가 없어지는 것을 알 수 있었다.


그래서 extends 없이 기능을 구현해 보았다.

import { Recoder } from "./recoder.model";

export class Recoders {
  recoders: Recoder[];
  isEmpty: boolean;

  constructor(recoders?: Recoder[]) { 
    this.recoders = recoders;
  }

  push(recoder: Recoder) {
    this.recoders.push(recoder);
  }
  
}

이럴 경우, Template Rendering 시 오류(문제)가 발생했다.

*ngFor을 사용하여 HTML에 리스트를 뿌릴 수 없다.

반응형

'프로그래밍 > Ionic' 카테고리의 다른 글

Ionic singleton 싱글턴 패턴 [싱글톤]  (0) 2021.07.15
ionic-modal tutorial 예제  (0) 2021.07.03
ion-input 안드로이드 작동  (0) 2021.06.07
Ionic 어플 - 아이폰 앱 설치(배포)  (0) 2021.05.04
아이오닉 form handling  (0) 2020.02.14
반응형

service나 module은 기보적으로 싱글턴으로 작동한다.

하지만 여기서는 클래스 단위의 싱글턴을 사용할 것이다.


시간을 yyyyMMdd패턴으로 바꾸어주는 클래스를 예시로 들어보겠다.

namespace 와 export 키워드를 반드시 사용한다.

// date-formatter.ts

export namespace DateFormatterSingleton {  

    export function nowYYYYmmDD():string {
        let _temp = new Date();
        return _yyyyMMdd(_temp);
    }

    export function toYYYYmmDD(date: string):string {
        let _temp = new Date(date);
        return _yyyyMMdd(_temp);
    }

    function _yyyyMMdd(date: Date) {
        return date.getFullYear()+'-'
        +_toTwoDigits((date.getMonth()+1).toString())+'-'
        +_toTwoDigits(date.getDate().toString());
    }

    function _toTwoDigits(numeric: string):string {
        return numeric.length == 1 ? "0"+numeric : numeric;
    }
}


사용방법

import { DateFormatterSingleton } from 'src/app/model/date-formatter';

datePicker: string = DateFormatterSingleton.nowYYYYmmDD();

위 코드와 같이 사용하면된다. Java에서와 같이 getInstance()와 같은 호출은 필요없다.

반응형
반응형

1. modal page 생성

2. 상위 module에 import 'modal page'

3. modal page 코드 작성


Ionic5 Angular 기반으로 작성하였습니다.


1. modal page 생성

// cli로 하는 경우, 명령어를 입력해 생성합니다.
ionic generate page modal-exam

generate page를 사용하면, 4개의 파일이 생성됩니다.

module.ts, html, scss, ts

// modal-exam.module.ts

const routes: Routes = [
  {
    path: 'modal-exam',
    component: ModalExamPage
  }
];

@NgModule({
  imports: [
	...
  ],
  declarations: [ModalExamPage],
  exports: [ModalExamPage]
})
export class ModalExamPageModule {}

[route 사용하는 경우]

반드시 path에 위치를 기입해주세요.


2. 상위.module에 NgModule에 등록하기

// home.module.ts

... 
@NgModule({
  imports: [
	...
    ModalExamPage
  ],
})
export class HomeModule { }

3. modal page 코드 작성

<!-- modal-exam.html -->

<div class="ion-page">
  <ion-header>
    <ion-toolbar>
      <ion-buttons slot="end">
        <ion-button (click)="closeModal()">닫기</ion-button>
      </ion-buttons>
      <ion-title>{{data}}</ion-title>
    </ion-toolbar>
  </ion-header>
  <ion-content class="ion-padding">
    <ion-item>
      내용을 추가하세요
    </ion-item> 
  </ion-content>
</div>
// modal-exam.page.ts

import { Component, Input, OnInit } from '@angular/core';
import { ModalController } from '@ionic/angular';

@Component({
  selector: 'app-modal-exam',
  templateUrl: './modal-exam.page.html',
  styleUrls: ['./modal-exam.page.scss'],
})
export class EditInfoPage implements OnInit {
  
  @Input() data: string;

  constructor(public modalController: ModalController) { }

  ngOnInit() {}

  closeModal() {
    this.modalController.dismiss({
      'dismissed': true
    });
  }

}
<!-- home.component.html -->
<div class="ion-page">
  <ion-header [translucent]="true">
    <ion-toolbar>
    <ion-title>
      모달 예제
    </ion-title>
    </ion-toolbar>
  </ion-header>
  <ion-content class="ion-padding" [fullscreen]="true">
    <ion-item >
      <ion-label>수정하기</ion-label>
      <ion-button color="success" slot="end" (click)="editLocation()">
        <ion-icon name="arrow-forward"></ion-icon>
      </ion-button>
    </ion-item>
  </ion-content>
</div>
// home.component.ts

import { Component, OnInit } from '@angular/core';
import { ModalController } from '@ionic/angular';

@Component({
  selector: 'app-template',
  templateUrl: './home.component.html',
  styleUrls: ['./home.component.scss'],
})
export class TemplateComponent implements OnInit {

constructor(public modalController: ModalController) { }

  ngOnInit() {}
  
  async presentModal() {
    const modal = await this.modalController.create({
      component: EditInfoPage,
      componentProps: {
        'data': 'modal-example'
      }
    });

    modal.onDidDismiss().then((res:any) => {
      if (res !== null) {
        console.log('Modal Sent Data : '+ res.data);
      }
    });

    return await modal.present();
  }

}
반응형
반응형

ionic serve를 이용한 웹 버전에서는 아무런 문제가 없던 기능이

android에서 작동하면 의도와는 다르게 데이터가 바인딩이 안되는 경우가 있었습니다.


안드로이드에서는 Ion-input 태그가 의도와는 다르게 작동하는 것을 발견하였습니다.


제가 추측하기에는 안드로이드의 경우,

ion-input > input 태그의 값을 가져오도록 설정되어 있는것 같습니다.


ion-input아래 input태그 화면

캐패시터에서 바인딩을 어떤식으로 해주는지 몰라서 여러 시도를 해보았습니다.

결국 dom을 만질 때 처럼 직접 element의 attr을 접근해야 했습니다.

constructor(private el: ElementRef) {}

  onkeyup() {
    const _el = this.el.nativeElement.firstElementChild;
    if (_el.value != _el.value.trim() || !this.isHHmm(_el.value)){
      this._removeLastString(_el);
      return;
    }
    if (_el.maxLength < _el.value.length) {
      this._removeLastString(_el);
      return;
    }
  }

constructor 불러올 때, Element로 반인딩 합니다.


ion-input태그는 nativeElement입니다.

input은 firstElementChild입니다.


위 사진과 같이 저는 input child로 되어 있기 때문에 firstElementChild를 사용했습니다.


그럼 input에 직접 접근할 수 있게 됩니다.

value의 값을 가져오고, 직접 수정할 수 있습니다.

반응형

'프로그래밍 > Ionic' 카테고리의 다른 글

Ionic singleton 싱글턴 패턴 [싱글톤]  (0) 2021.07.15
ionic-modal tutorial 예제  (0) 2021.07.03
Ionic 어플 - 아이폰 앱 설치(배포)  (0) 2021.05.04
아이오닉 form handling  (0) 2020.02.14
Ionic 4 배포하기  (0) 2019.11.08
반응형

애플 개발자 미가입자의 경우,
기기 설치 후 7일만 사용할 수 있습니다.

1. 웹 빌딩하기 www 폴더가 생성됩니다.

ng build

2. ios 빌딩

ionic capacitor add ios

3. xcode 열기

3.1. open a project of file > ios/App/App.wcworkspace선택 > 환경설정 > 계정 설정(+ 계정 추가)

파일 열기 및 계정 설정

3.2. 아이폰 케이블로 연결하기(아이폰과 연결 안될 시 정품 케이블 사용)

3.3. PROJECT의 TARGETS의 App에서 Signing&Capabilities 에서 팀 설정 > iOS Device 설정 > Build(재생버튼)

앱 빌드 설정 및 빌딩

4. 신뢰하지 않는 개발자 해결하기

아이폰에서 설정 > 일반 > 기기 관리 > 개발자 앱 > 신뢰하기

반응형

'프로그래밍 > Ionic' 카테고리의 다른 글

ionic-modal tutorial 예제  (0) 2021.07.03
ion-input 안드로이드 작동  (0) 2021.06.07
아이오닉 form handling  (0) 2020.02.14
Ionic 4 배포하기  (0) 2019.11.08
Ionic 4 searchbar 자동완성  (0) 2019.10.24
반응형

모듈 기본 세팅값

// module.ts

import { NgModule } from '@angular/core';
import { CommonModule } from '@angular/common';
import { RouterModule } from '@angular/router';
import { FormsModule, ReactiveFormsModule } from '@angular/forms';
import { IonicModule } from '@ionic/angular';

@NgModule({
  imports: [
    IonicModule,
    CommonModule,
    FormsModule,
    ReactiveFormsModule
  ]
  ...

위와같은 환경?을 구축해 두셔야 합니다.


<!-- HTML -->
<form [formGroup]="optionForm" (ngSubmit)="submitForm()">

  <ion-item lines="full">
    <ion-label position="floating">날짜</ion-label>
    <ion-datetime formControlName="workDate" min="2020-02-11" displayFormat="YYYY-MM-DD"></ion-datetime>
  </ion-item>
  
  <ion-button type="submit" color="danger" expand="block" [disabled]="!optionForm.valid">설정하기</ion-button>  
  
</form>

기본적으로 <form>, <ion-input>, <ion-button> 이렇게 3개로 구성됩니다.


// ts.file

import { Component, OnInit } from '@angular/core';
import { Validators, FormGroup, FormBuilder } from '@angular/forms';

@Component({
  selector: ... 생략
})
export class ... {

  optionForm: FormGroup;

  constructor(public formBuilder: FormBuilder) { }

  ngOnInit() {
    this.optionForm = this.formBuilder.group({
      workDate: [new Date().toISOString(), [Validators.required]]
    })
  }
  
  submitForm() {
    console.log(this.optionForm.value)
  }
}

onInit할때, form을 설정합니다. (Validator 및 초기값을 추가할 수 있습니다.)


submit 버튼에 [disabled]="!optionForm.valid"를 이용하여 모든 form구릅 안에 있는 Validation이 통과해야만 클릭할 수 있도록

할 수 있습니다.


결과화면(입력전)
결과화면(입력후)


반응형

'프로그래밍 > Ionic' 카테고리의 다른 글

ion-input 안드로이드 작동  (0) 2021.06.07
Ionic 어플 - 아이폰 앱 설치(배포)  (0) 2021.05.04
Ionic 4 배포하기  (0) 2019.11.08
Ionic 4 searchbar 자동완성  (0) 2019.10.24
DataHandling  (0) 2019.10.18
반응형

환경 - 맥, Ionic4, angular


아래 3개의 명령어를 실행하세요. - angular cli가 글로벌(-g)로 설치되어 있어야 합니다.

ng build --prod  

ionic capacitor sync android 

ionic capacitor sync ios

capacitor.config.json

appId: 앱스토에서 사용될 Id 

더보기

android studio에서 열기 : ionic capacitor open android 

x-code에서 열기 : ionic capacitor open ios

Android 세팅

<!-- android/app/src/main/res/values/strings.xml app_name -->

<!-- 앱아이디 = capacitor.config.json의appId -->

<string name="app_name">PairBnB</string>
<string name="title_activity_main">PairBnB</string>
<string name="package_name">앱아이디</string>
<string name="fileprovider_authority">앱아이디</string>
<string name="custom_url_scheme">앱아이디</string>
<!-- android/app/src/main/AndroidManifest.xml -->

<!-- 앱아이디 = capacitor.config.json의appId -->

<manifest xmlns:android="..." package="앱아이디"> ... </manifest>


// android/app/src/build.gradle

// 앱아이디 = capacitor.config.json의appId

defaultConfig {
	applicationId "앱아이디"	
}

//versionCode, versionName을 통해서 버전을 변경할 수 있습니다.


퍼미션은 AndroidManifest 에서 uses-permission 테그에서 확인 할 수 있습니다.


iOS세팅

<!-- ios/App/App/Info.plist -->

<key>CFBundleDisplayName</key>
  <string>PairBnB</string>

X-code에서 App을 열면 오른쪽화면에서 Version을 변경할 수 있습니다.


아이콘 변경


Image Gorilla(아이콘 다양한 크기 제공)는 구글에서 쉽게 접근할 수 있습니다.


ios

App/App/Assets.xCss 에서 아이콘을 드래그 엔 드랍으로 변경합니다.


Android

App/res를 마우스 오른쪽 후 new Image Assets을 누릅니다. 다운받은 Icon Png File을 서택합니다.


splashscreen을 Image Gorilla를 통해 다운받습니다.

App/res/drawable-land.../splash.png를 변경해 줍니다.


Android Deploy

안드로이드 스튜디오 에서 

Build->Generate Signed Bundle/APK -> next

key store path : 나의 저장소

password : 마음대로


next를 하다보면 buildType이 나옵니다. 반드시 release로 해야합니다.


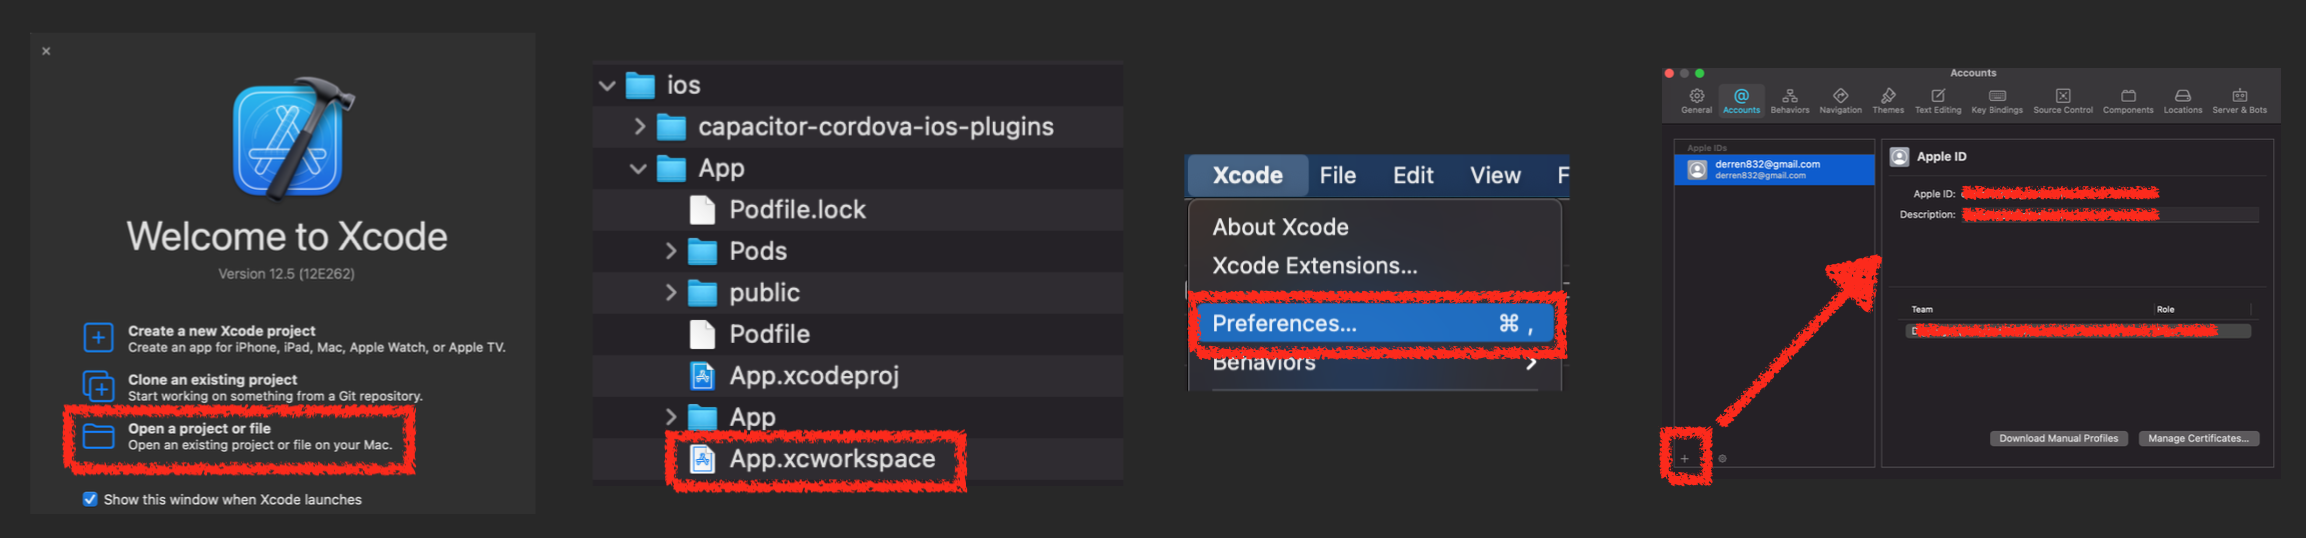
iOS Deploy - 유료계정이 없네요 ㅠㅠ


Web - progressive web app Deploy

www폴더가 배포할 수 있는 폴더입니다.


하지만 PWA로 진행해보겠습니다.

아래 2개를 명령어를 실행합니다.


ng add @angular/pwa

ng build --prod


filrebase를 이용하는 경우에 다음과 같이 실행합니다.

fireabse init

?  What do you want to use as your public directory? www
? Configure as a single-page app (rewrite all urls to /index.html)? Yes
? File www/index.html already exists. Overwrite? 마음것 하세용~


www/ngsw-config.json에 있느 설정값으로 deploy됩니다.


다음 명령어를 실행합니다.

firebase deploy


반응형

'프로그래밍 > Ionic' 카테고리의 다른 글

Ionic 어플 - 아이폰 앱 설치(배포)  (0) 2021.05.04
아이오닉 form handling  (0) 2020.02.14
Ionic 4 searchbar 자동완성  (0) 2019.10.24
DataHandling  (0) 2019.10.18
State 관리  (0) 2019.10.12
반응형

html 세팅

<!-- child component HTML -->
<ion-searchbar autocomplete="on" [(ngModel)]="searchbarInput" (ionInput)="filterItems($event)"
  debounce="500">
</ion-searchbar>

<ion-list *ngIf="listActive">
  <ion-item *ngFor="let item of items" (click)="fillSearchbarText(item.title)" style="cursor: pointer;">
    <ion-label>
      <strong>{{item.title}}</strong>
    </ion-label>
  </ion-item>
</ion-list>

<ion-searchbar

autocomplete="on" : 자동완성 기능을 사용합니다.

[(ngModel)]="searchbarInput" : searchbarInput과 ion-searchbar의 input을 2-way바인딩 합니다.

(ionInput)="filterItems($event)" : Input에 입력될 때 마다 filterItems() 메쏘드를 실행합니다.

debounce="500" : (ionInput)의 작동 시간에 반응 시간을 설정합니다. (기본은 250)


<ion-list *ngIf="listActive" : ion-list를 표시할 때 쓰는 flag입니다.

<ion-item *ngFor="let item of items" : filterItems로 필터링 된 값을 뿌립니다.

<ion-item (click)="fillSearchbarText(item.title)" : 해당 아이템의 값을 바인딩된 searchbarInput에 넣습니다.


// child component ts file
import { Component, Input, ViewChild, Output, EventEmitter } from '@angular/core';
import { DeviceCommon, ItemView } from '../device-common';

class ItemView {
  title: string
}

@Component({
  selector: 'app-autocomplete-searchbar',
  templateUrl: './autocomplete-searchbar.component.html',
  styleUrls: ['./autocomplete-searchbar.component.scss'],
})
export class AutocompleteSearchbarComponent {

  @Input() itemViewArr: ItemView[];
  @Output() itemSelected = new EventEmitter<string>();
  @ViewChild('', { static: true }) searchbarInput: string;

  private listActive = false;
  private items: ItemView[] = [];

  constructor(private common: DeviceCommon) { }

  initializeItems() {
    this.items = [...this.itemViewArr];
  }

  includeAnySpell = (result: ItemView[], item: ItemView, term: string) => {
    const include = (str: string) => str.toLowerCase().indexOf(term.toLowerCase()) > -1;
    if (include(item.title)) {
      result.push(item.title)
    }
    return result;
  }

  filterItems(ev: any) {
    this.initializeItems();
    const term: string = ev.target.value;
    if (term && term.trim() != '') {
      this.listActive = true;
      this.items = this.items.reduce((result: ItemView[], item: ItemView) => this.includeAnySpell(result, item, term), []);
    } else {
      this.listActive = false;
    }
  }

  fillSearchbarText(title: string) {
    this.searchbarInput = title;
    this.listActive = false;
    this.itemSelected.emit(title);
  }

}

@Input() itemViewArr: ItemView[]; : 부모 컴포넌트에서 받은 property값입니다.

@Output() itemSelected = new EventEmitter<string>(); : 부모 컴포넌트에 보낼 이벤트입니다.

@ViewChild('', { static: true }) searchbarInput: string; : [(ngModel)]="searchbarInput" 바인딩을 선언합니다.


  initializeItems() {
    this.items = [...this.itemViewArr];
  }


외부에서 받은 itemViewArr값을 this.items에 복사하여 넣습니다.


  includeAnySpell = (result: ItemView[], item: ItemView, term: string) => {
    const include = (str: string) => str.toLowerCase().indexOf(term.toLowerCase()) > -1;
    if (include(item.title)) {
      result.push(item.title)
    }
    return result;
  }

  filterItems(ev: any) {
    this.initializeItems();
    const term: string = ev.target.value;
    if (term && term.trim() != '') {
      this.listActive = true;
      this.items = this.items.reduce((result: ItemView[], item: ItemView) => this.includeAnySpell(result, item, term), []);
    } else {
      this.listActive = false;
    }
  }

includeAnySpell = (result: ItemView[], item: ItemView, term: string) => {...} : Array.reduce에 사용할 함수 선언합니다.

const include = (str: string) => str.toLowerCase().indexOf(term.toLowerCase()) > -1; : input에서 입력된 값중에 한글자라도 포함되면 true 를 반환하는 함수입니다.


filterItems(ev: any) : <ion-searchbar (ionInput)="filterItems($event)" 로써 입력될 때 마다 작동합니다.

this.initializeItems(); : 아이템을 초기화합니다.

const term: string = ev.target.value; : input에 입력된 값을 가져옵니다.


fillSearchbarText(title: string) {
    this.searchbarInput = title;
    this.listActive = false;
    this.itemSelected.emit(title);
  }

<ion-item 을 클릭했을 때 작동하는 메쏘드 입니다.

this.searchbarInput=title; : 해당 item의 값을 input에 입력합니다.

this.itemSelected.emit(title); : 선택된 값을 부모 컴포넌트에 전달합니다.


<!-- parent component HTML -->

<app-autocomplete-searchbar [itemViewArr]="itemViewArr" (itemSelected)="autocompletedValue($event)"
</app-autocomplete-searchbar>

<app-autocomplete-searchbar  : 위의 child component 입니다.

[itemViewArr]="itemViewArr" : child component에서 @Input으로 받을 값 입니다.

[itemViewArr] : child component에서 사용할 property값 입니다.

"itemViewArr" : parent component에서 보내는 ts 값입니다.


(itemSelected)="autocompletedValue($event)" :

(itemSelected) : child component의 itemSelected(EventEmitter).emit()이 실행될 때 

"autocompletedValue($event)" : parent component에서 실행 될 메쏘드로 child component에서 값을 받습니다.


// parent component ts
itemViewArr: ItemView[] = [];

setItemView() {
this.itemViewArr = [];
  this.msgHouse.msgHouse.forEach(msgRoom => {
    this.itemViewArr.push(new ItemView(msgRoom.title));
  })
}

autocompletedValue(title: string) {
    if (title && title.length) {
	  console.log(title);
    }
  }


setItemView() {...} : child component로 들어갈 this.itemViewArr을 채웁니다.


autocompletedValue(title: string) : child component에서 보낸 값을 받는 메쏘드 입니다.


응용을 하면 아래와 같은 화면도 가능합니다.

f를 입력했을 경우, f가 포함된 모든 단어들이 다 나오도록 할 수 있습니다.


반응형

'프로그래밍 > Ionic' 카테고리의 다른 글

아이오닉 form handling  (0) 2020.02.14
Ionic 4 배포하기  (0) 2019.11.08
DataHandling  (0) 2019.10.18
State 관리  (0) 2019.10.12
Styling & Theming  (0) 2019.10.12
반응형

Http

1. HttpClient 사용

1.1. HttpClientModule을 App.module.ts import

// file.ts

@NgModule({
  declarations: [AppComponent],
  imports: [HttpClientModule, IonicModule.forRoot(), AppRoutingModule],
  ...

1.2. httpClient사용하면서 알게된 점.

// file.ts

http.get('URL').forEach(...)

return http.get('URL').pipe(...)  // 어디선가 subscribe()가 있어야만 실행됨.

httpClinet.http.get 앞에 반드시 return해주어야 subscribe 할 수 있습니다.


Subjection


2. BehaviorSubject<T[]>([]) 사용


2.1. _array에 값 할당하기

// file.ts

private _array = new BehaviorSubject<T[]>([]);

method() {
const _temp: T[] = [];
 ...
 this._array.next(_temp);
}

Json

get의 타입지정시 1

interface Person {
	name: string,
    age: number
}

// http.get<Person[]>(...)
// http.get<{[name: string, age:number]}>(...)

// file.json
[{
    "name": "hello",
    "age": 20
  },
 {
    "name": "world",
    "age": 22
  }
]

get의 타입지정시 2

// json data

interface Person {
	name: string,
    age: number
}

// http.get<[poeple: string]: Person[]>(...)
// http.get<{[people: string]: [{name: string, age: number}]}>(...)

{
  "people":[
    {
      "name": "hello",
      "age": 20
    },
    {
      "name": "world",
      "age": 22
    }
  ]
}


반응형

'프로그래밍 > Ionic' 카테고리의 다른 글

Ionic 4 배포하기  (0) 2019.11.08
Ionic 4 searchbar 자동완성  (0) 2019.10.24
State 관리  (0) 2019.10.12
Styling & Theming  (0) 2019.10.12
유용한 컴포넌트 소개  (0) 2019.10.12
반응형

State : 

UI State spinner의 작동 시기 및 Loading 데이터.
Temporary / Local State Service의 List와 같은 데이터.
Persistent State Storage 혹은 Database와 같은 자료


RxJS의 Subject를 이용한 UI State 관리

Http로 데이터를 로딩하는 동안 Spinner를 작동하는 예제로 설명하겠습니다.


Http - Async Data를 로딩 합니다. (delay를 사용했습니다.)

최신의 데이터를 받아서 UI의 랜더링을 할 수 있도록 State를 관리합니다.


  //service.ts
  
  import { BehaviorSubject } from 'rxjs';
    // BehaviorSubject<제네릭>(초기값)으로 Subject로 객체를 주입합니다.
  private _places = new BehaviorSubject<Place[]> ([
    new Place(), new Place()
  ]);

    // Observable로 리스트를 보냅니다. 가장 최신의 async값을 보내기 위함입니다.
  get places() {
    return this._places.asObservable();
  }
  
  import { take, tap, delay } from 'rxjs/operators';
  /* Observable을 반환 하는 take, delay, tap  operator입니다.
     tap: 
     탭은 3가지의 경우에 쓰일 수 있습니다.
     nextOrObserver: Observable이 실행 될 경우.
     error: 에러가 발생한 경우.
     complete: 완료된 경우.
  */ 
  addPlace() {
    const newPlace = new Place(); //Place를 생성하는 값들을 제거한 버전입니다.
      // pipe operator들을 연속해서 사용할 수 있도록 합니다.
    return this.places.pipe(
        //가장 최근의 값만 가져와 처리합니다.
      take(1), 
        //Http의 로딩을 해야하지만, 코드가 길어지므로 대체. 시간을 1초로 합니다.
      delay(1000), 
        //해당 매쏘드에서 consume하지 않고 return합니다.
      tap(places => {
          // BehaviorSubject.next() 실행할 작업을 기입합니다.
        this._places.next(places.concat(newPlace)); // 해당 리스트에 newPlace를 추가합니다.
      })
    );
  }
// page.ts

  isLoading = false;

  import { LoadingController } from '@ionic/angular';
    // 로딩시 spinner를 작동할 수 있도록 LoadingContorller 사용.
  constructor(private loadingCtrl: LoadingController) {}
  
  onCreateOffer() {
    this.loadingCtrl
      .create({
        message: 'Creating place...' // 스피너와 함께 나올 문구
      })
      .then(loadingEl => {
        loadingEl.present(); // 스피너를 UI에 표시.
        this.placesService
            // 위에서 구현한 매쏘드
          .addPlace()
            // next()를 구독(subscribe)
          .subscribe(() => { 
            loadingEl.dismiss(); // UI에서 스피너 제거.
          });
      });
  }


번외.

ionic의 lifeCycle을 관리해주어야 합니다.

ngOnInit() 의 경우 angular가 관리를 해주지만, Subject는 사용자가

ngOnDestroy()를 해주어야 합니다.

//page.ts

import { Subscription } from 'rxjs';
  // Subscription을 주입합니다.
private placeSub: Subscription;

  매쏘드() {
    this.placeSub = this.placesService
        .addPlace()
        .subscribe(
          ... // 여러 작업 수행
        });
    });
  }
  
  ngOnDestroy() {
    if (this.placeSub) {
      this.placeSub.unsubscribe();
    }
  }
반응형

'프로그래밍 > Ionic' 카테고리의 다른 글

Ionic 4 searchbar 자동완성  (0) 2019.10.24
DataHandling  (0) 2019.10.18
Styling & Theming  (0) 2019.10.12
유용한 컴포넌트 소개  (0) 2019.10.12
캐패시터로 네이티브 앱 만들기  (0) 2019.09.25

+ Recent posts