html 세팅
<!-- child component HTML -->
<ion-searchbar autocomplete="on" [(ngModel)]="searchbarInput" (ionInput)="filterItems($event)"
  debounce="500">
</ion-searchbar>

<ion-list *ngIf="listActive">
  <ion-item *ngFor="let item of items" (click)="fillSearchbarText(item.title)" style="cursor: pointer;">
    <ion-label>
      <strong>{{item.title}}</strong>
    </ion-label>
  </ion-item>
</ion-list>
<ion-searchbar
autocomplete="on" : 자동완성 기능을 사용합니다.
[(ngModel)]="searchbarInput" : searchbarInput과 ion-searchbar의 input을 2-way바인딩 합니다.
(ionInput)="filterItems($event)" : Input에 입력될 때 마다 filterItems() 메쏘드를 실행합니다.
debounce="500" : (ionInput)의 작동 시간에 반응 시간을 설정합니다. (기본은 250)
<ion-list *ngIf="listActive" : ion-list를 표시할 때 쓰는 flag입니다.
<ion-item *ngFor="let item of items" : filterItems로 필터링 된 값을 뿌립니다.
<ion-item (click)="fillSearchbarText(item.title)" : 해당 아이템의 값을 바인딩된 searchbarInput에 넣습니다.
// child component ts file
import { Component, Input, ViewChild, Output, EventEmitter } from '@angular/core';
import { DeviceCommon, ItemView } from '../device-common';

class ItemView {
  title: string
}

@Component({
  selector: 'app-autocomplete-searchbar',
  templateUrl: './autocomplete-searchbar.component.html',
  styleUrls: ['./autocomplete-searchbar.component.scss'],
})
export class AutocompleteSearchbarComponent {

  @Input() itemViewArr: ItemView[];
  @Output() itemSelected = new EventEmitter<string>();
  @ViewChild('', { static: true }) searchbarInput: string;

  private listActive = false;
  private items: ItemView[] = [];

  constructor(private common: DeviceCommon) { }

  initializeItems() {
    this.items = [...this.itemViewArr];
  }

  includeAnySpell = (result: ItemView[], item: ItemView, term: string) => {
    const include = (str: string) => str.toLowerCase().indexOf(term.toLowerCase()) > -1;
    if (include(item.title)) {
      result.push(item.title)
    }
    return result;
  }

  filterItems(ev: any) {
    this.initializeItems();
    const term: string = ev.target.value;
    if (term && term.trim() != '') {
      this.listActive = true;
      this.items = this.items.reduce((result: ItemView[], item: ItemView) => this.includeAnySpell(result, item, term), []);
    } else {
      this.listActive = false;
    }
  }

  fillSearchbarText(title: string) {
    this.searchbarInput = title;
    this.listActive = false;
    this.itemSelected.emit(title);
  }

}
@Input() itemViewArr: ItemView[]; : 부모 컴포넌트에서 받은 property값입니다.
@Output() itemSelected = new EventEmitter<string>(); : 부모 컴포넌트에 보낼 이벤트입니다.
@ViewChild('', { static: true }) searchbarInput: string; : [(ngModel)]="searchbarInput" 바인딩을 선언합니다.
  initializeItems() {
    this.items = [...this.itemViewArr];
  }
외부에서 받은 itemViewArr값을 this.items에 복사하여 넣습니다.
  includeAnySpell = (result: ItemView[], item: ItemView, term: string) => {
    const include = (str: string) => str.toLowerCase().indexOf(term.toLowerCase()) > -1;
    if (include(item.title)) {
      result.push(item.title)
    }
    return result;
  }

  filterItems(ev: any) {
    this.initializeItems();
    const term: string = ev.target.value;
    if (term && term.trim() != '') {
      this.listActive = true;
      this.items = this.items.reduce((result: ItemView[], item: ItemView) => this.includeAnySpell(result, item, term), []);
    } else {
      this.listActive = false;
    }
  }
includeAnySpell = (result: ItemView[], item: ItemView, term: string) => {...} : Array.reduce에 사용할 함수 선언합니다.
const include = (str: string) => str.toLowerCase().indexOf(term.toLowerCase()) > -1; : input에서 입력된 값중에 한글자라도 포함되면 true 를 반환하는 함수입니다.
filterItems(ev: any) : <ion-searchbar (ionInput)="filterItems($event)" 로써 입력될 때 마다 작동합니다.
this.initializeItems(); : 아이템을 초기화합니다.
const term: string = ev.target.value; : input에 입력된 값을 가져옵니다.
fillSearchbarText(title: string) {
    this.searchbarInput = title;
    this.listActive = false;
    this.itemSelected.emit(title);
  }
<ion-item 을 클릭했을 때 작동하는 메쏘드 입니다.
this.searchbarInput=title; : 해당 item의 값을 input에 입력합니다.
this.itemSelected.emit(title); : 선택된 값을 부모 컴포넌트에 전달합니다.
<!-- parent component HTML -->

<app-autocomplete-searchbar [itemViewArr]="itemViewArr" (itemSelected)="autocompletedValue($event)"
</app-autocomplete-searchbar><app-autocomplete-searchbar : 위의 child component 입니다.
[itemViewArr]="itemViewArr" : child component에서 @Input으로 받을 값 입니다.
[itemViewArr] : child component에서 사용할 property값 입니다.
"itemViewArr" : parent component에서 보내는 ts 값입니다.
(itemSelected)="autocompletedValue($event)" :
(itemSelected) : child component의 itemSelected(EventEmitter).emit()이 실행될 때
"autocompletedValue($event)" : parent component에서 실행 될 메쏘드로 child component에서 값을 받습니다.
// parent component ts
itemViewArr: ItemView[] = [];

setItemView() {
this.itemViewArr = [];
  this.msgHouse.msgHouse.forEach(msgRoom => {
    this.itemViewArr.push(new ItemView(msgRoom.title));
  })
}

autocompletedValue(title: string) {
    if (title && title.length) {
	  console.log(title);
    }
  }
setItemView() {...} : child component로 들어갈 this.itemViewArr을 채웁니다.
autocompletedValue(title: string) : child component에서 보낸 값을 받는 메쏘드 입니다.
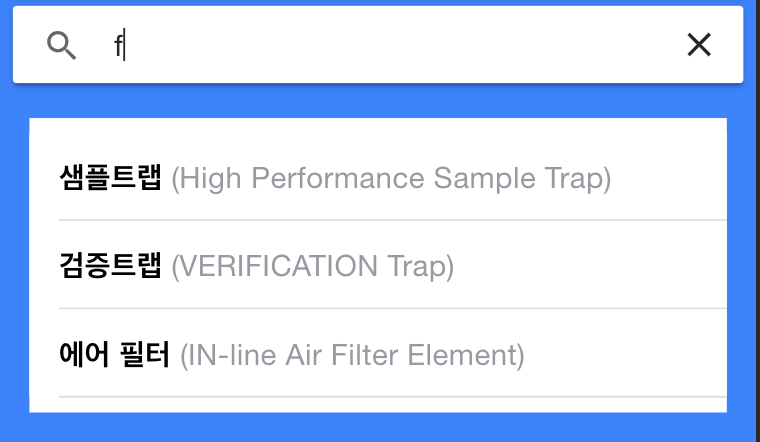
응용을 하면 아래와 같은 화면도 가능합니다.
f를 입력했을 경우, f가 포함된 모든 단어들이 다 나오도록 할 수 있습니다.
'프로그래밍 > Ionic' 카테고리의 다른 글
| 아이오닉 form handling (0) | 2020.02.14 |
|---|---|
| Ionic 4 배포하기 (0) | 2019.11.08 |
| DataHandling (0) | 2019.10.18 |
| State 관리 (0) | 2019.10.12 |
| Styling & Theming (0) | 2019.10.12 |