import { BrowserModule } from '@angular/platform-browser';
import { NgModule } from '@angular/core';
import { FormsModule } from '@angular/forms';


import { AppComponent } from './app.component';

@NgModule({
  declarations: [
    AppComponent
  ],
  imports: [
    BrowserModule,
    FormsModule,
  ],
  providers: [],
  bootstrap: [AppComponent]
})
export class AppModule { }
template driven 에서는 FormsModule을 사용합니다.
template driven에 들어가기 앞서 용어와 개념을 정리해보았습니다.
What are the difference between one way binding and two way binding?
Answer (1 of 5): A two-way binding involves an implementation of a single “watcher set” for both the model and the component, and updating either one when the other changes. Angular 1 uses this method by default using ng-Model. Watchers are created to hand
www.quora.com
이벤트 바인딩
<button (click) = “TheEventMethod()”>Save</button>DOM에서 JavaScript function을 작동 시키도록 event를 알립니다.
속성(프로퍼티) 바인딩
<p[size] = “fontSizePx”></p>JavaSciprt로 설정된 fontSizePx라는 변수값을 가져옵니다.
2-way-바인딩
<input type='text' placeholder= "Enter stock symbol" [(ngModel)] = "lastStockSymbol">
이벤트 바인딩과 속성 바인딩을 동시에 사용하는 것이 2-way-바인딩 입니다.
클릭 이벤트 function을 상징하는 ()와 속성 바인딩 []두개가 동시에 쓰인것이 보이죠?
<input type='text' placeholder= "Enter stock symbol" [value]="lastStockSymbol" (input) = "lasStockSymbol=$event.target.value">
<br>The value of lastStockSymbol is {{lastStockSymbol}}
service를 이용하여 DOM을 update함으로써, 2-way-binding을 구현할 수 있습니다.
#foo 로컬 레퍼런스
1. regist - input input태그를 이용하여 Angular에게 알리기를 실행해 봅니다..
input 태그에 directive를 추가합니다. ngModel :2-way-binding이 됩니다.
html directive를 추가해줍니다
<form>
  <div id="user-data">
    <div class="form-group">
      <label for="username">Username</label>
      <input
        type="text"
        id="username"
        class="form-control"
        ngModel
        name="username">
    </div>
  </div>
</form>
submit할 수 있도록 만들어 보겠습니다.
form태그 안에 submit 버튼을 만들어 type="submit"을 만들게 클릭하게 한다면, HTML의 defalut로 작동하는 call이 trigger되어 request를 보내기 때문에, form태그에 (ngSubmit)="onSubmit()"을 추가합니다.
<form (ngSubmit)="onSubmit()">...</form>ts
onSubmit() {
  console.log("submitted!")
}
또한 form의 reference를 받으려면 #f를 추가하면 됩니다.
HTML
<form (ngSubmit)="onSubmit(f)" #f="ngForm">...</form>#f 는 local reference입니다.
Angular가 자동적으로 Javascript 객체를 생성해줍니다.
typescript
// <form (ngSubmit)="onSubmit(f)" #f></form>
onSubmit(form: ElementRef) {
  console.log(form);
}

// <form (ngSubmit)="onSubmit(f)" #f="ngForm"></form>
onSubmit(form: NgForm) {
  console.log(form);
}
form을 보면 아래와 같이 접근할 수 있습니다.
NgForm.value={
key: value
}
2-way-바인딩을 조금더 편하게 사용하기 위해 @ViewChild를 이용합니다.
import { Component, ViewChild } from '@angular/core';
import { NgForm } from '@angular/forms';

export class AppComponent {
  @ViewChild('f') singupForms: NgForm;

  onSubmit() {
    console.log(this.singupForms);
  }
}
ViewChild는 로컬 레퍼런스와 element를 TypeScript 코드로 변경 하기에 유용하기 때문입니다.
Form State
form태그 안쪽에 있는 input에 다음과 같은 directive를 사용할 수 있습니다.
또한 required, eail과 같은 vaild설정을 할 수 있습니다.
local reference 사용하기.
<input
  type="email"
  id="email"
  class="form-control"
  ngModel
  required
  email
  #email="ngModel">
<span class="help-block" *ngIf="!email.vaild && email.touched">Please enter for vaild</span>
email input태그를 선택 후 아무것도 입력하지 않고 벗어나면, please enter for vaild라는 문구가 나오게 됩니다.
#email="ngModel" 을 사용함으로써 local reference로 HTML에서 email을 사용할 수 있습니다.
이와 마찬가지로,
submit 버튼에 disabled를 추가할 수 있습니다.
<button
  class="btn btn-primary"
  type="submit"
  [disabled]="!f.vaild">
Submit</button>
CSS 스타일을 관리합니다.
input.ng-invaild { ... }Angular가 class를 추가하여 form에 위와 같은 상태를 갖고 있습니다.
default값 설정하기! - one-way-binding
기본값을 지정할 수 있습니다. [ngModel]
HTML
<select
  id="secret"
  class="form-control"
  [ngModel]="defaultQuestion"
  name="secret">
  <option value="pet">Your first Pet?</option>
  <option value="teacher">Your first teacher?</option>
</select>
ts
export class AppComponent {

  defaultQuestion = "pet";

}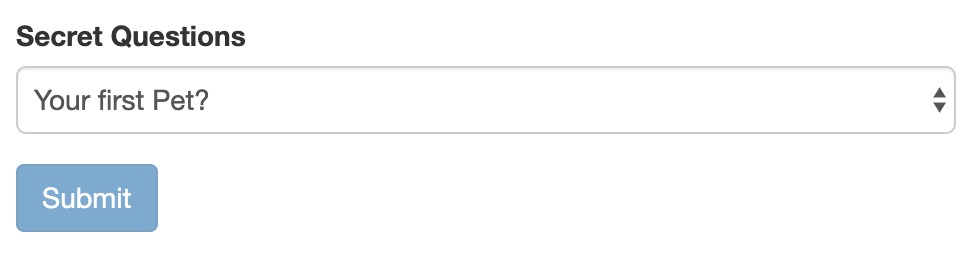
그림과 같이 pet option태그가 설정되어 있습니다.
2-way-바인딩
<div class="form-group">
  <textarea
    name="questionAnswer"
    rows="3"
    [(ngModel)]="answer"></textarea>
</div>
<p>Your reply: {{answer}}</p>
export class AppComponent {
answer = '';
}
No-바인딩 : Angular에게 input이 동작만 전달합니다.
1-way-바인딩 : 기본값(default value)을 이용하여 값에 나타납니다.
2-way-바인딩 : 사용자 입력과 동시에 value와 화면에 나타납니다.
그룹핑 하기 - ngMoudelGroup
<form (ngSubmit)="onSubmit()" #f="ngForm">
  <div
    id="user-data"
    ngModelGroup="userData"
    #userData="ngModelGroup">
      <div class="form-group">
        <label for="username">Username</label>
        <input
        type="text"
        id="username"
        ngModel
      </div>
      <div class="form-group">
        <label for="email">Mail</label>
        <input
        type="email"
        id="email"
        class="form-control"
        ngModel
        name="email">
      </div>
  </div>
</form>
ngForm.value.userData 가 그룹으로 묶여 있음을 확인할 수 있습니다.

2-way-바인딩 다른 방법
ngForm.setValue();
this.signupForm.setValue({
  userData: {
    username: suggestedName,
    email: ''
  },
  secret: 'pet',
  questionAnswer: '',
  gender: 'male'
});
모든 값이 덮어쓰기가 됩니다.
ngForm.form.patchValue();
this.signupForm.form.patchValue({
  userData: {
    username: suggestedName
  }
});
한개의 값만 변경합니다.
값 빼내기
user = {
    username: '',
    email: '',
    secretQuestion: '',
    answer: '',
    gender: ''
  };

onSubmit() {
  this.user.username = this.signupForm.value.userData.username;
  this.user.email = this.signupForm.value.userData.email;
  this.user.secretQuestion = this.signupForm.value.secret;
  this.user.answer = this.signupForm.value.questionAnswer;
  this.user.gender = this.signupForm.value.gender;

  this.signupForm.reset();
}
위와 같이 객체를 만들어 사용합니다.
'프로그래밍 > Angular' 카테고리의 다른 글
| Form - 복습 및 보충 내용 (0) | 2019.08.14 |
|---|---|
| FormHandling - Reavice (0) | 2019.07.02 |
| Observable & Subject (0) | 2019.06.26 |
| Router 정리 (0) | 2019.06.25 |
| Routes (0) | 2019.06.17 |